How to get a Whatsapp Business API Account?
How to get a Whatsapp Business API Account?
PREREQUISITES:
- Get a brand new phone number.
- Set Up Facebook Page. Make sure that you are the admin of your Facebook Business Page.
- Verify Business in Facebook Business Manager
- Whatsapp Business Solution Provider
Whatsapp API account through BSP:
WABA Onboarding
- Click on Continue with Facebook in WATI or select the Whatsapp Channel in Sleekflow.
- Login into your Facebook Account. Click Continue
Click Get Started to link your Facebook page
- Select the Facebook page you want to link with the Whatsapp Business Account.
- Create the new Whatsapp Business Account by giving the Business Name and timezone.
- An Account will be set up.
- Next is creating the Whatsapp Business Profile. Give in your display name.(If display name is different from business name provide proof that it belongs to the smae business).
- Select the business category and give a brief description(optional) about your business.
- Verify your Whatsapp Business Phone Number by entering the code received through text message or voice call.
- Onboarding ends here.
- Next is to verify your business in the Facebook Business Manager.
Business Verification in Facebook Business Manager:
DOCUMENTS REQUIRED:
- Business Bank Statement
- Business License
- Certificate of Incorporation
- Goods and Services Tax Certificate
- Permanent Account Number Card (PAN)
- Udyog Aadhar
- Shop Establishment Certificate
- Utility Bill
Steps to get your business verified in Facebook Business Manager:
1. Create a Facebook Business Manager Account:
- If you haven't already, go to business.facebook.com and create an account.
- Follow the prompts to fill in your business details and create your account.
2. Access Business Settings:
- Once you're logged into your Business Manager account, click on the 'Business Settings' option in the top right corner.
3. Navigate to Security Center:
- In the Business Settings menu, find and click on 'Security Center' in the left-hand column.
4. Start Verification Process:
- Within the Security Center, look for the 'Verification' section and click on 'Start Verification'. Provide your business's details, including the legal business name, address, phone number and website.
- If no matching record is found, upload supporting documents, such as a business licence or articles of incorporation, to confirm the details you entered.
5. Select Verification Method:
- Facebook offers different methods for verification. Choose the one that suits your business best. 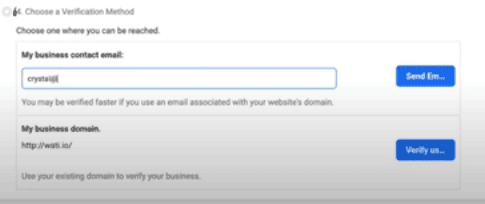
-A confirmation code will be sent if you choose email, phone, text message or WhatsApp. To confirm via domain verification, follow these steps.
-A confirmation code will be sent if you choose email, phone, text message or WhatsApp. To confirm via domain verification, follow these steps.
Email (The domain of your business email address must match the domain of your website.)
Phone number
Text message
WhatsApp message
Domain verification (You must have admin access to your site's web host or DNS provider.)
6. Submit Required Documents (if applicable):
- Depending on the verification method you choose, you might need to submit certain documents such as business licenses, utility bills, or tax documents. Ensure these documents meet Facebook's requirements for verification.
7. Wait for Review:
- After submitting your verification request and any necessary documents, wait for Facebook to review your request. This process may take some time, so be patient.
8. Receive Verification Decision:
- Facebook will notify you of the verification decision via email or within the Business Manager notifications. If approved, your business will be verified. If denied, Facebook will usually provide a reason for the denial.
9. Address Any Issues (if applicable):
- If your verification request is denied, review the reason provided by Facebook and take necessary steps to address any issues. This may involve providing additional information or correcting errors in your submission.
10. Resubmit Verification (if necessary):
- If your initial verification request is denied, you can usually resubmit your request after addressing any issues. Follow the instructions provided by Facebook for resubmission.
11. Maintain Verification Status:
- Once your business is verified, ensure that you continue to comply with Facebook's policies and guidelines to maintain your verification status. This may include updating business information as needed and adhering to community standards.
By following these steps, you should be able to get your business verified in Facebook Business Manager.
Related Articles
Meta Business Manager Setup Guide
Meta Business Manager Setup Guide To use the WhatsApp Business API, your business must have a centralized and verified Meta Business Manager account. This ensures that Meta can verify your brand's legitimacy and provide you with a secure environment ...WhatsApp Business API Setup Checklist
WhatsApp Business API Setup Checklist Setting up the WhatsApp Business Platform (API) involves several moving parts. Use this checklist to track your progress and ensure a smooth, professional launch for your brand. Phase 1: Essential Prerequisites ...Documents Required for WhatsApp Business API
Documents Required for WhatsApp Business API To access the WhatsApp Business Platform (API), Meta requires businesses to undergo a verification process. Having these documents ready beforehand will speed up your approval from days to just a few ...Meta Business Verification Process
Meta Business Verification is the process of proving that your business is a legitimate, legally registered entity. While it is not always mandatory to start messaging, it is the "gold standard" for security and is required to unlock higher messaging ...Categories of Whatsapp Business Account
WhatsApp Business API Without Facebook Business Verification Aspect Limit Without Verification Notes Messaging Tier Tier 0 – up to 50 messages/day Only to users who have opted in and within the 24-hour window. Total Contacts Reachable Max 2 phone ...